I’ve been putting off this migration for a while, but I finally sat down and moved my blog to AWS—and it was far easier than I expected!
For years, I’ve run and hosted BrainsToBytes using Ghost, which despite being excellent software (I do recommend it), has become harder to justify as time went on. This is mainly for two reasons:
-
Hosting costs are steep for what I get out of the blog. This project doesn’t generate any revenue, and I mostly keep it because despite not being a very good writer, I find the process fun and engaging when I have time. The cheapest Ghost Pro subscription with all basic features costs $25/month, and I just can’t justify spending $300 a year on this project. I eventually found a good solution by running the blog on Pikapods (it’s awesome—check it out if you have time), but then I wondered if I could run the blog even cheaper.
-
I simply don’t care for or use all the features Ghost provides, and I’d rather have more control over the software I use for my blog. This is just a nitpick—as I said, Ghost is quite good and I like it—but I still wanted to see if there was an easier way to run a simple static blog.
That started a search that ended with the current version of the blog. As with most things, it had a boring part and a fun part.
The Boring Part: Finding a Static Site Generator
I wanted something simple and customizable that would let me run the blog with enough control to properly customize everything I wanted, but with enough simplicity to get out of the way and just let me write. I discovered static site generators, read a little about them, and decided they were the right tool for the job.
After some consideration, I decided to try two different projects:
I ended up choosing Jekyll because I love Ruby and cannot engage in critical thinking the advantages of Hugo (it’s faster, it’s new and cool) aren’t as important as the advantages I got from Jekyll:
- Very easy setup
- Lots of themes and customizations
- I know Ruby better than I know Go
- Easy to understand and use
- Fast enough—I mean, it’s just generating a static site and only takes a few seconds
Porting the site was easy since I had already written every blog post using Markdown. It was just a matter of putting files in the right folder, adding front matter (Jekyll-specific YAML you have to add to each post), and sorting out the images into their right folders with references.
It took me a few hours of tedious work, but I got it done. It was actually much, much faster and easier than I’d been expecting.
If I had known beforehand that it would be this painless, I would have probably done it a long time ago.
This was the boring part of the migration, but I ended up with a completely static site. No need for databases or servers—just simple static files. Now I just needed to find a way to serve the site, hopefully in an easy, fast, and cheap way.
The Fun Part: Creating the Infrastructure
I’ve been learning about cloud computing for the past few months (almost a year now, maybe), and this seemed like a good opportunity to put that knowledge to use. I’ve learned how to use most services in AWS, and recently, I’ve been getting more involved in IaC (Infrastructure as Code) using CDK. (Note: If you’re getting started with IaC in Amazon Web Services, do yourself a favor and learn the bare minimum of CloudFormation template writing, then jump straight into CDK—you’ll have a much better time there.)
Building a way to serve a static site in AWS for very little money and really good performance turns out to be quite easy. The setup is more or less like this:
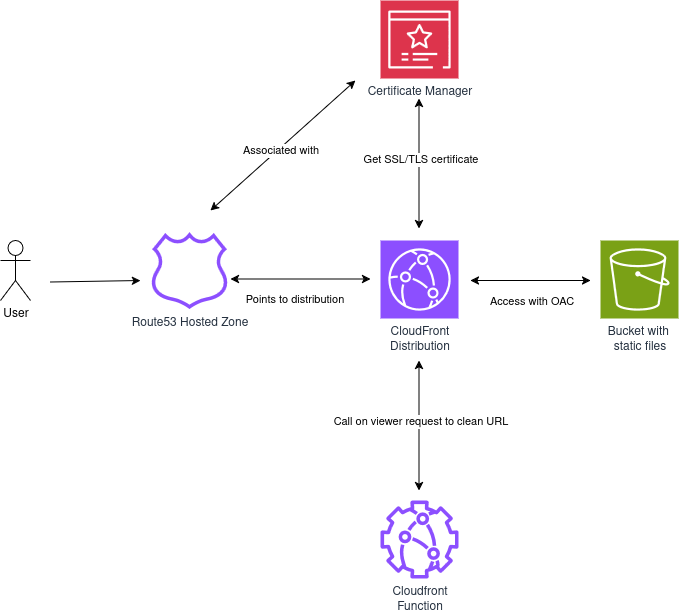
- An AWS Route53 Hosted Zone lets you define how to route access for a given domain. I created a hosted zone and configured it so that traffic on the apex (brainstobytes.com) and the www subdomain (www.brainstobytes.com) will be directed to my CloudFront distribution.
- I want people to be able to access the website safely using HTTPS, so I configured and validated a certificate using AWS Certificate Manager and associated it with my CloudFront distribution.
- The CloudFront distribution is in charge of serving and caching my service at several locations around the planet. This ensures the experience is snappy and the website behaves in a fault-tolerant way.
- The static files that the CloudFront distribution will serve are stored in an S3 bucket. The S3 bucket itself isn’t reachable from anywhere else, and we’re using the Origin Access Control (OAC) feature to enable communication only between the distribution and the bucket.
- The way Jekyll generates files and URLs is a bit problematic for this setup, but I managed to fix this issue by writing a small JavaScript function (a CloudFront Function that gets run at the edge location where the cached site is stored) to clean up the URL. The code itself looks like this:
async function handler(event) {
    var request = event.request;
    var uri = request.uri;

    // Check whether the URI is missing a file name.
    if (uri.endsWith('/')) {
        request.uri += 'index.html';
    }

    // Check whether the URI is missing a file extension.
    else if (!uri.includes('.')) {
        request.uri += '.html';
    }

    return request;
}
Then I just associate the function with the cloudfront distribution and make sure it runs on the viewer request hook. The function itself was adapted from this other function found in the AWS documentation.
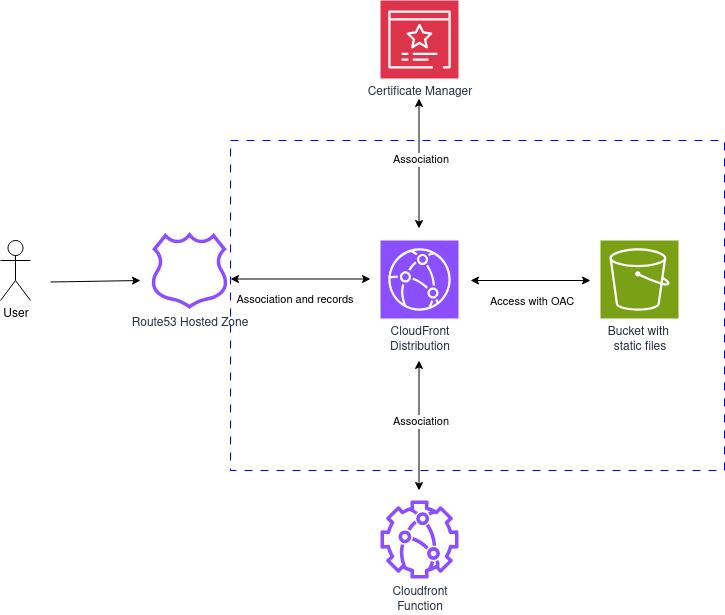
Now I just had to write a template for automating the creation of this infrastructure. I took a few considerations when writing it that led me to conclude I should create three resources by hand and automate all the rest:
-
The hosted zone and certificate were created by hand beforehand and validated then. This makes the deployment easier because the template doesn’t care which hosted zone or certificates I provide, and it lets me quickly associate different distributions with a variety of domains. It was useful while prototyping solutions for other projects. The function was written by hand and added to my AWS account using the console, this way I can reuse the same function for all my Jekyll deployments.
-
The template just receives references to these resources as props for the Stack class, then performs all the required resource creation, all the wiring, and even the addition of records to the Hosted Zone. The template implements the contents of the dotted blue rectangle in the following diagram:
The template looks like this:
import * as cdk from "aws-cdk-lib";
import { Tags } from "aws-cdk-lib";
import { Construct } from "constructs";
import { aws_s3 as s3 } from "aws-cdk-lib";
import { aws_cloudfront as cloudfront } from "aws-cdk-lib";
import { aws_certificatemanager as acm } from "aws-cdk-lib";
import { aws_route53 as route53 } from "aws-cdk-lib";
import { aws_cloudfront_origins as origins } from "aws-cdk-lib";
import { aws_route53_targets as targets } from "aws-cdk-lib";
import { aws_s3_deployment as s3deploy } from "aws-cdk-lib";

interface JekyllCloudStackProps extends cdk.StackProps {
  domainName: string;
  subDomain: string;
  certificateArn: string;
  pathToProject: string;
  cloudfrontFunctionName: string;
  cloudfrontFunctionArn: string;
}

export class JekyllCloudStack extends cdk.Stack {
  constructor(scope: Construct, id: string, props: JekyllCloudStackProps) {
    super(scope, id, props);

    // Because we are dealing with Jekyll, we know the names of these two files in advance
    const indexFilename = "index.html";
    const errorFilename = "404.html";

    const {
      domainName,
      subDomain,
      certificateArn,
      pathToProject,
      cloudfrontFunctionName,
      cloudfrontFunctionArn,
    } = props;

    const fullDomain = `${subDomain}.${domainName}`;

    const hostedZone = route53.HostedZone.fromLookup(this, "siteHZ", {
      domainName: domainName,
    });

    const certificate = acm.Certificate.fromCertificateArn(
      this,
      "siteCertificate",
      certificateArn
    );

    const siteBucket = new s3.Bucket(this, "siteBucket", {
      bucketName: domainName,
      websiteIndexDocument: indexFilename,
      websiteErrorDocument: errorFilename,
      publicReadAccess: false,
      removalPolicy: cdk.RemovalPolicy.DESTROY, // If we delete our stack, we delete this bucket
      autoDeleteObjects: true,
    });

    const distributionDomainNames = subDomain
      ? [domainName, fullDomain]
      : [domainName];

    const distribution = new cloudfront.Distribution(this, "siteDistribution", {
      defaultBehavior: {
        origin: origins.S3BucketOrigin.withOriginAccessControl(siteBucket),
        allowedMethods: cloudfront.AllowedMethods.ALLOW_GET_HEAD_OPTIONS,
        viewerProtocolPolicy: cloudfront.ViewerProtocolPolicy.REDIRECT_TO_HTTPS,
        compress: true,
        functionAssociations: [
          {
            eventType: cloudfront.FunctionEventType.VIEWER_REQUEST,
            function: cloudfront.Function.fromFunctionAttributes(
              this,
              "jekyllResolveFunction",
              {
                functionName: cloudfrontFunctionName,
                functionArn: cloudfrontFunctionArn,
              }
            ),
          },
        ],
      },
      defaultRootObject: indexFilename,
      certificate: certificate,
      domainNames: distributionDomainNames,
      priceClass: cloudfront.PriceClass.PRICE_CLASS_100,
    });

    const apexARecord = new route53.ARecord(
      this,
      "cloudfrontApexDistroRecord",
      {
        recordName: domainName,
        target: route53.RecordTarget.fromAlias(
          new targets.CloudFrontTarget(distribution)
        ),
        zone: hostedZone,
      }
    );

    if (subDomain) {
      new route53.ARecord(this, "cloudfrontSubdomainDistroRecord", {
        recordName: fullDomain,
        target: route53.RecordTarget.fromAlias(
          new targets.Route53RecordTarget(apexARecord)
        ),
        zone: hostedZone,
      });
    }

    new s3deploy.BucketDeployment(this, "DeployWithInvalidation", {
      sources: [s3deploy.Source.asset(pathToProject)],
      destinationBucket: siteBucket,
      distribution,
      distributionPaths: ["/*"],
    });

    Tags.of(siteBucket).add("project", domainName);
    Tags.of(distribution).add("project", domainName);
  }
}
Note that for the price class, I am using cloudfront.PriceClass.PRICE_CLASS_100, which caches my content only in Europe and North America. If you want to serve your content globally, you should use one of the larger price classes. This will let you cache your site at more locations, but it’s more expensive.
And voilà! After just running cdk deploy, I can now put any Jekyll site on AWS, running on a highly-available and fast platform for way less than $1 per month!
You can, of course, do the same and just reuse my template or adapt it to your needs. I think there’s something to gain from studying the template and trying to understand how CDK defines and wires different components—that has helped me understand things quickly in the past too.
What I Learned
What I learned from this project is that, one, perhaps I shouldn’t procrastinate on medium-sized projects because I’m probably overestimating the effort involved in completing them, and two, working with infrastructure as code serves as an amplifier for your software development skills. It can be a lot of fun and quite profitable too! So yeah, that’s the story of how I finally managed to migrate my blog.
Additional Note
There is a chance that the function provided above can give you trouble depending on how you configured your Jekyll project. It may return a Forbidden access page when accessing some URLs that end with a trailing forward slash. To fix that, you can use this version of the CloudFront function:
async function handler(event) {
    var request = event.request;
    var uri = request.uri;

    // We remove the trailing / from all URLS except for the root and the pagination pages
    if(uri !== '/' && !uri.includes('/page') && uri.endsWith('/') ) {
        uri = uri.slice(0, -1);
    }

    // Check whether the URI is missing a file name.
    if (uri.endsWith('/')) {
        uri += 'index.html';
    }

    // Check whether the URI is missing a file extension.
    else if (!uri.includes('.')) {
        uri += '.html';
    }

    request.uri = uri;
    return request;
}