The source code for this article can be found here.
Welcome to another cloud experiment! The idea behind these hands-on tutorials is to provide practical experience building cloud-native solutions of different sizes using AWS services and CDK. We’ll focus on developing expertise in Infrastructure as Code, AWS services, and cloud architecture while understanding both the “how” and “why” behind our choices.
A pipeline for Processing PDFs
Your company has launched a new initiative to extract additional value from the PDFs generated by client systems. The plan is to build a pipeline that pulls relevant information from these files and uses it to train a machine learning model, or something like that. Management does not really know how it’s going to go about it, but you are still tasked with designing and building the first sections of the pipeline. Congratulations!
We know that we want to build a serverless pipeline for transforming PDF files into a series of PNG images (one per page) and extracting the text from every page. We’ll work at the page level throughout the pipeline, which means splitting the PDF into individual page representations while maintaining traceability to the original file.
We can create a solution using only S3 buckets and Lambda functions. Here’s our architecture:
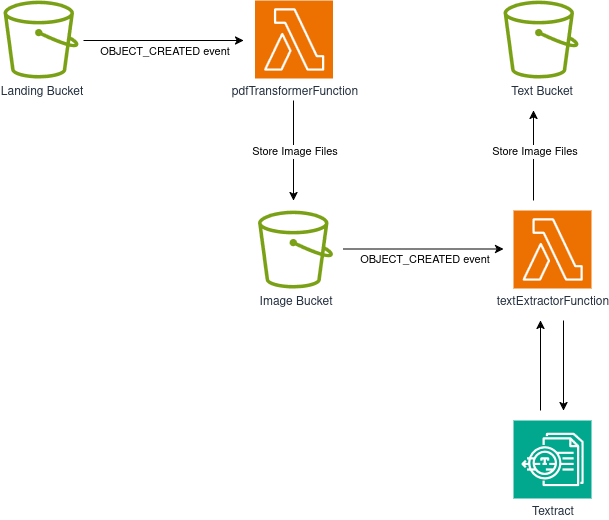
The flow is as follows:
- An S3 bucket serves as our landing bucket and entry point for the workflow. Client applications or other system components can upload PDF files here.
- The landing bucket uses S3 Event Notifications to trigger a Lambda function whenever an object is created. This function splits the PDF into individual pages and converts each page to a PNG image, storing the results in our image bucket.
- The image bucket emits events when objects are created (same as our landing bucket!), triggering a second Lambda function that extracts text from each PNG image.
- The text extraction Lambda function calls AWS Textract to perform OCR on the images in the image bucket. The extracted text is then saved to our text bucket.
The workflow straightforward and gives us a great opportunity to work with multiple AWS services and get some hands-on experience with the S3 and Textract SDKs. Let’s get started!.
Creating our Project
We just need to create an empty folder (I named mine ServerlessPdfProcessingPipeline) and run the cdk init app --language typescript inside it.
This next change is totally optional, but the first thing I do after creating a new CDK project is to head into the bin folder and rename the app file to main.ts. Then I open the cdk.json file and edit the app config like this:
{
{
  "app": "npx ts-node --prefer-ts-exts bin/main.ts",
  "watch": {
    ...
}
Now your project will recognize main.ts as the main application file. You do not have to do this, I just like having a file named main serving as main app file.
Creating our Buckets
Now you can open the file inside of the lib folder and start building your stack! First, add the necessary imports at the top:
import * as cdk from "aws-cdk-lib";
import { Construct } from "constructs";
import { aws_s3 as s3 } from "aws-cdk-lib";
import { aws_lambda as lambda } from "aws-cdk-lib";
import { aws_s3_notifications as s3n } from "aws-cdk-lib";
import { aws_iam as iam } from "aws-cdk-lib";
We are using V2 imports, it’s a bit cleaner this way. Now let’s create our S3 buckets, we will need:
- A landing bucket, for PDF files, and serving as entrypoint for our system.
- An image bucket, for PNG representations of each page in a PDF.
- A text bucket, containing text extracted for each page in TXT format.
Building these resources is quite easy, we just need to add the following lines to our constructor:
 constructor(
    scope: Construct,
    id: string,
    props?: cdk.StackProps
  ) {
    super(scope, id, props);

    const landingBucket = new s3.Bucket(this, "landingBucket", {
      removalPolicy: cdk.RemovalPolicy.DESTROY,
      autoDeleteObjects: true,
    });

    const imageBucket = new s3.Bucket(this, "imageBucket", {
      removalPolicy: cdk.RemovalPolicy.DESTROY,
      autoDeleteObjects: true,
    });

    const textBucket = new s3.Bucket(this, "textBucket", {
      removalPolicy: cdk.RemovalPolicy.DESTROY,
      autoDeleteObjects: true,
    });
Note that we are configuring each bucket to get automatically destroyed if we delete our stack. This is fine if we are planning to deploy this pipeline on a development or staging environment, but we should avoid this in production environments. If we are concerned about storages costs, we can instead configure our buckets with a Lifecycle policy to remove objects after a given amount of time or move them into a cheaper storage class.
Serverless Computing Using Lambda Functions
We need to write two lambda functions, one for splitting a PDF file into PNG images, and one for extracting text from each image.
Create a folder called lambdas at the project’s root level (alongside bin and lib), then create two folders:
- pdf_to_image
- text_extractor
Each folder will contain the assets for its respective lambda function.
Extracting Text
Let’s write the text extractor function first, it’s a bit easier. We will use Ruby for this one, so that we get enough practice with using the AWS SDK with different languages. Within the text_extractor folder, create a file called text_extractor.rb:
# frozen_string_literal: true

require 'aws-sdk-s3'
require 'cgi'
require 'aws-sdk-textract'

TEXTRACT = Aws::Textract::Client.new
S3 = Aws::S3::Client.new

def handler(event:, context:)
  bucket = event['Records'][0]['s3']['bucket']['name']
  key = CGI.unescape(event['Records'][0]['s3']['object']['key'])
  text_bucket_name = ENV['TEXT_BUCKET_NAME']

  response = TEXTRACT.detect_document_text(
    {
      document: {
        s3_object: {
          bucket: bucket,
          name: key
        }
      }
    }
  )

  text_content = response.data
                         .blocks
                         .select { |b| b.block_type == 'LINE' }
                         .map(&:text)
                         .join("\n")

  S3.put_object(
    bucket: text_bucket_name,
    key: "#{File.basename key, '.png'}.txt",
    body: text_content
  )
end
Note the following details:
- We are defining the clients for S3 and TEXTRACT outside of the handler. This is a standard best practice when working with Lambdas because it maximizes performance: Code defined outside of the handler will stay active for future invocations within the lambda execution environment while it’s still “hot”.
- Inside of the handler, we dig into the contents of the event to find the bucket name, and key (filename) for the object we will process. We are passing the target bucket name as an environment variable.
- We perform a call to the TEXTRACT API and get back a response that holds information extracted from the file it points to. Note that we do not pass the contents of the image, we just point textract to the bucket and object (file) we want to process. This is part of the convenience gained from AWS interoperability. Because we just care about blocks containing text we filter and format only those with the type LINE.
- Finally, we store our text into the target bucket (our text bucket) using a put_object call.
Splitting a PDF Into PNG Images
In the spirit of learning, let’s use Python for the next function. Create pdf_to_image_transformer.py in the pdf_to_image folder:
import boto3
import botocore.exceptions
import io
import os
import logging
import urllib
from pdf2image import convert_from_bytes

s3 = boto3.resource('s3')
logger = logging.getLogger()
logger.setLevel("INFO")


def handler(event, context):
    bucket = event['Records'][0]['s3']['bucket']['name']
    key = urllib.parse.unquote_plus(event['Records'][0]['s3']['object']['key'], encoding='utf-8')
    image_bucket_name = os.environ.get('IMAGE_BUCKET_NAME')
    target_dpi = int(os.environ.get('TARGET_DPI'))

    # Perform image conversion, 1 page -> 1 image
    pdf_file = bytes(s3.Object(bucket, key).get()['Body'].read())
    images = convert_from_bytes(pdf_file, dpi=target_dpi, fmt="png",)

    key_without_extension, _ = os.path.splitext(key)
    # Store each image on S3
    for count, image in enumerate(images):
        try:
            buffer = io.BytesIO()
            image.save(buffer, format=image.format)
            s3_object = s3.Object(
                image_bucket_name, f"{key_without_extension}_page{count+1}.png")
            s3_object.put(Body=buffer.getvalue())
        except botocore.exceptions.ClientError as e:
            logger.error(e)
There is not much to note about this one, the code is pretty straightforward: We receive an event, use that information to retrieve the PDF file and process it using pdf2image’s convert_from_bytes function to transform each page into an image, and then store those images into S3.
The most noteworthy thing about this lambda function is the usage of pdf2image, which is not included in the default lambda Python runtime. In a previous article we learned how to handle Python dependencies on lambda environments using the bundling option, but unfortunately this time it won’t help us.
Why?
Because pdf2image depends on the poppler-utils package, and installing that file using the same technique turns out to the a real pain. No biggie, we have another easy solution for this problem: Create a docker image with the dependencies (both the poppler-utils package and the pdf2iamge module) and deploy the lambda using that image.
Next to your python file, create another file called requirements.txt:
pdf2image==1.17.0
Next, create a third file and call it Dockerfile:
FROM public.ecr.aws/lambda/python:3.13

# Copy function code
COPY pdf_to_image_transformer.py ${LAMBDA_TASK_ROOT}

# Install additional system dependencies
RUN dnf install poppler-utils -y

# Install Python dependencies
COPY requirements.txt ${LAMBDA_TASK_ROOT}
RUN pip install -r requirements.txt

# Set the CMD to your handler (could also be done as a parameter override outside of the Dockerfile)
CMD [ "pdf_to_image_transformer.handler" ]
This Dockerfile installs poppler-utils using dnf, copies all required files, installs Python dependencies, and sets the Lambda entry point.
Your lambdas folder structure should now look like this:

We are done with the contents of our lambda functions. Return to your stack file in the lib folder and add these Lambda function definitions:
//... before this, we defined our buckets

const pdfTransformerFunction = new lambda.DockerImageFunction(
  this,
  "pdfTransformFunction",
  {
    code: lambda.DockerImageCode.fromImageAsset("lambdas/pdf_to_image"),
    environment: {
      TARGET_DPI: String(props.targetDpi),
      IMAGE_BUCKET_NAME: imageBucket.bucketName,
    },
    description: "Transforms a PDF into images, one per page",
    memorySize: 512,
    timeout: cdk.Duration.seconds(120),
  }
);

const textExtractionFunction = new lambda.Function(
  this,
  "textExtractionFunction",
  {
    runtime: lambda.Runtime.RUBY_3_3,
    code: lambda.Code.fromAsset("lambdas/text_extractor"),
    handler: "text_extractor.handler",
    environment: {
      TEXT_BUCKET_NAME: textBucket.bucketName,
    },
    description: "Extracts text from each image that gets created",
    timeout: cdk.Duration.seconds(120),
  }
);
We use different constructs for each function: DockerImageFunction for our containerized PDF processor and a standard Function for the Ruby text extractor. Both functions have configured timeouts and descriptions, with the PDF transformer getting extra memory since image manipulation can be resource-intensive.
We would like to have more control over the quality of the images produced during the transformation, and for that we need o make the DPI configurable. First, create a props interface at the top of your file:
interface ServerlessPdfProcessingPipelineStackProps extends cdk.StackProps {
  targetDpi: number;
}
And then change the constructor’s prop signature to accept an object of this type instead of the regular cdk.StackProps, like this:
props: ServerlessPdfProcessingPipelineStackProps
We are done with the bulk of the work already. Now let’s configure the event emission on the S3 buckets, and set the functions as their targets!
Configuring S3 Events
This part is quite straightforward:
    landingBucket.addEventNotification(
      s3.EventType.OBJECT_CREATED,
      new s3n.LambdaDestination(pdfTransformerFunction),
      { suffix: ".pdf" }
    );

    imageBucket.addEventNotification(
      s3.EventType.OBJECT_CREATED,
      new s3n.LambdaDestination(textExtractionFunction),
      { suffix: ".png" }
    );
For each bucket, we configure OBJECT_CREATED events to trigger the appropriate Lambda function, using suffix filters to ensure events only fire for the correct file types.
Adding Permissions and Creating the Stack
My favorite part of working with CDK is probably how easy it is to grant permissions to entities within AWS. We need:
- pdfTransformerFunction must be able to read from landingBucket
- pdfTransformerFunction must be able to write to imageBucket
- textExtractionFunction must be able to read from imageBucket
- textExtractionFunction must be able to write to textBucket
- textExtractionFunction must be able to call DetectDocumentText on the Textract service
In CDK, these permissions are defined as:
    landingBucket.grantRead(pdfTransformerFunction);
    imageBucket.grantWrite(pdfTransformerFunction);
    imageBucket.grantRead(textExtractionFunction);
    textBucket.grantWrite(textExtractionFunction);

    // Allow the text extraction lambda function to query the TEXTRACT API
    const textractPolicy = new iam.PolicyStatement({
      actions: ["textract:DetectDocumentText"],
      resources: ["*"],
    });
    textExtractionFunction.addToRolePolicy(textractPolicy);
And we are done. Now we can go into main.ts and create our stack:
const app = new cdk.App();
new ServerlessPdfProcessingPipelineStack(app, 'ServerlessPdfProcessingPipelineStack', { // Or whatever class name was given to your stack
    targetDpi: 300,
});
Running cdk deploy will build our project, create our lambda image, and deploy our stack directly into AWS!
Testing the Stack
After deployment, navigate to S3 and locate your landing bucket (it will have a long generated name like serverlesspdfprocessingpipel-landingbucket72c76a11-dkggauhw4bwe). Upload a PDF file—choose something reasonably sized as your Lambda may lack resources for very large files.
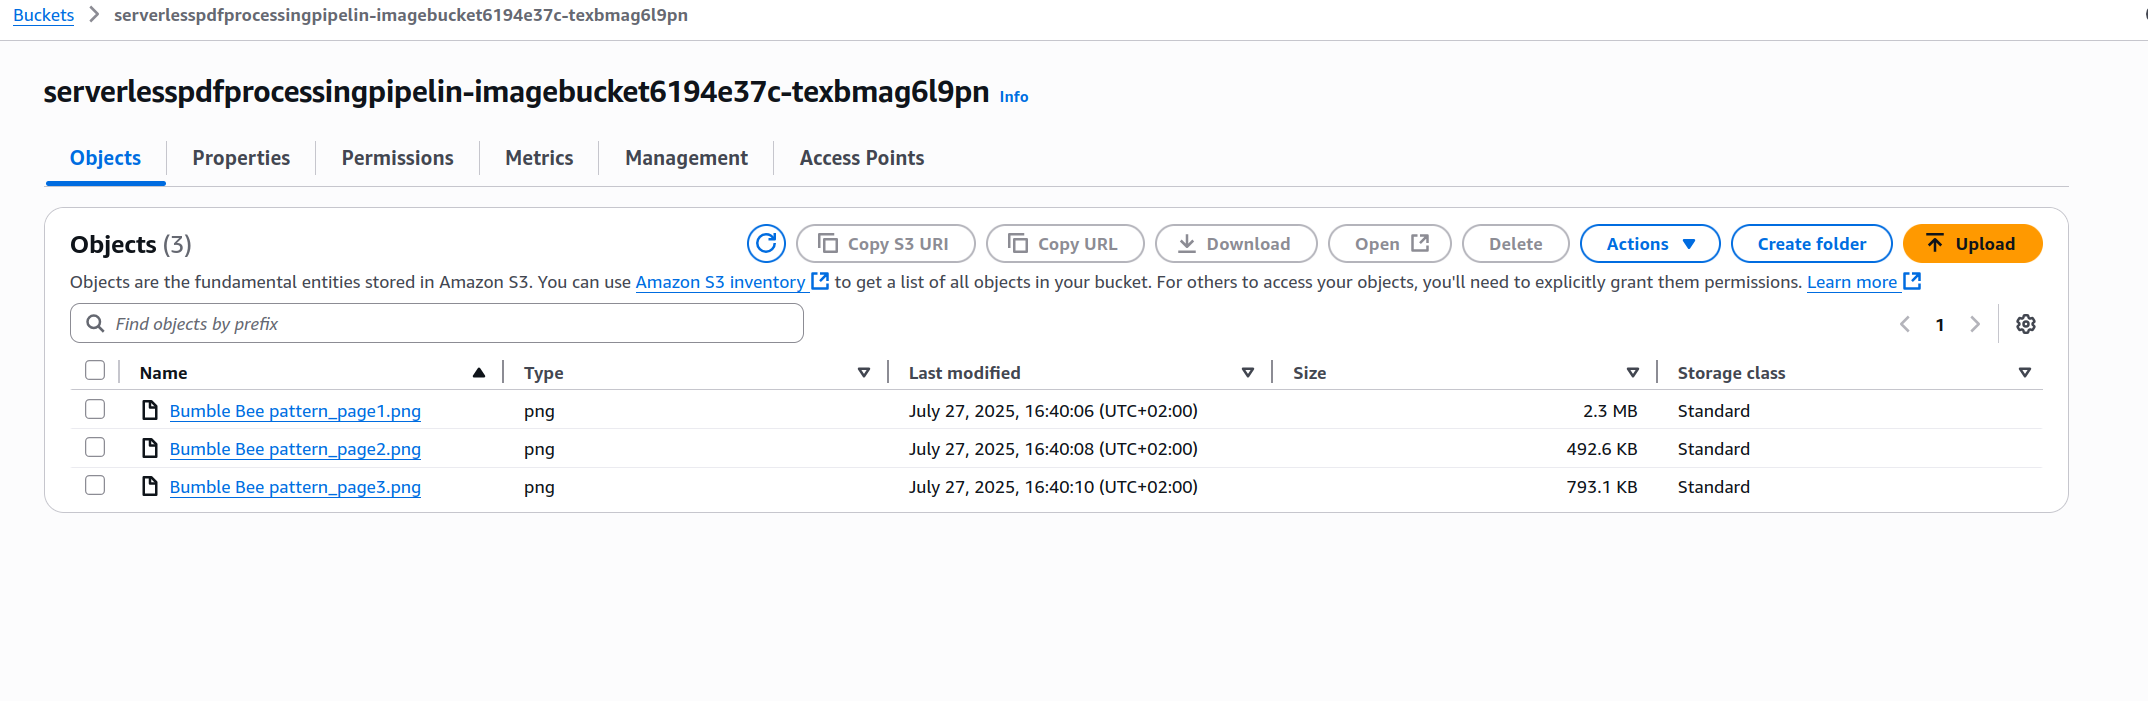
I used a crochet pattern written by my wife, it has three pages with images and instructions for making a little amigurumi bumblebees. After waiting a few seconds I went and inspected the image and text buckets and found this:
-
Image Bucket
-
Text Bucket

The contents correspond perfectly to each page in the original PDF.
IMPORTANT! Always remember to delete your stack, either by running cdk destroy or by deleting it manually on the console.
Improvements and Experiments
- Our function uses
detect_document_texton images, but Textract also offersstart_document_text_detectionfor async PDF processing. How would using this function change our architecture? Does it make sense for it to be triggered at the same time it does now? - With text representations of PDF content, how might you implement content moderation or filtering? What services could help with this?
- Could we simplify the PDF-to-PNG functionality using a different runtime? What would you try instead of Python and Docker?
- Experiment with different
targetDpivalues (75, 100, 200, 400, 600). How do changes affect function execution time and text extraction accuracy? Can you find an optimal balance between cost and quality? - Now that we have the first part of the pipeline in place, what type of analysis or further processing is possible, and how would you accomplish that?
- Is it possible to send the bucket events to an SQS queue instead passing them directly to each lambda function? What are the advantages and disadvantages of this approach?
We learn better when we play around with a system and try different thing, so do not be afraid to come up with your own experiments and modifications.
We did it! We finished our first cloud experiment, and got a little bit more hands-on experience working with cloud-native solutions.
I hope you find this useful!