The source code for this article can be found here.
Welcome to another cloud experiment! The idea behind these hands-on tutorials is to provide practical experience building cloud-native solutions of different sizes using AWS services and CDK. We’ll focus on developing expertise in Infrastructure as Code, AWS services, and cloud architecture while understanding both the “how” and “why” behind our choices.
Death of a Database
I really like Lambda functions, and I really like auto-scaling solutions. It’s just extremely convenient to have a system that elastically scales to meet performance demands automatically, all with minimal setup.
There are some challenges inherent to this approach. One of the most common occurs when a part of your system is incapable of scaling up in the same way, making the whole system lag behind (in the best case) or just collapse under the weight of the massive number of requests it receives from the scaled-up parts of your system.
Postgres is an awesome piece of software, but it wasn’t designed to automatically handle the massive number of incoming connections that can arise from systems that spawn dozens or hundreds of concurrent execution environments, like Lambda functions.
A good solution for this problem is to use an RDS proxy to protect your main database from being overloaded by too many connections. Your proxy will handle the connection pooling necessary to manage large numbers of concurrent lambdas or containers, saving your poor database from being crushed by far more connections than it can handle.
Designing a Solution
The problem setup is a simplified version of an architecture you may eventually find in the wild: An API Gateway is backed by a few Lambda functions, and these lambdas get their data by querying an RDS instance. There’s an inherent risk with this approach because your lambdas may end up spawning multiple concurrent execution environments to serve the demands of multiple users querying your API, and together they will open more connections than your database can handle.
We’ll create a simple gateway with a single URL and a single Lambda function. Sometimes this level of complexity is just right for understanding how to build a solution and learning a skill that may help you tackle bigger and more complex challenges at work. The general architecture of our system is as follows:
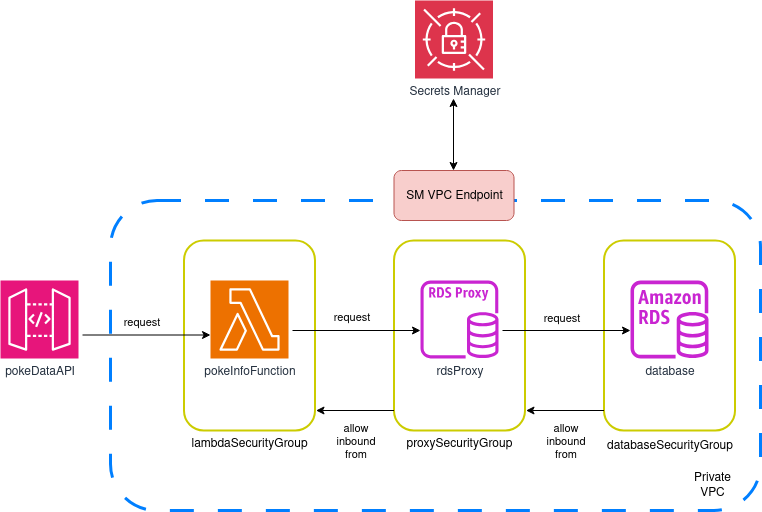
Let’s study the diagram for a few minutes before proceeding to ensure we understand what we’re trying to accomplish.
Design Details
The diagram is straightforward and easy to understand, but there are some details worth noting:
- We’ll create our own VPC instead of deploying our solution on the default regional VPC. It’s normally a good idea to have dedicated networks for different parts of your system, and this way we can ensure that access to our individual components can be easily controlled.
- We’ll ensure this VPC has subnets on at least two different availability zones, and we’ll try to keep them small. Every subnet will be private, and we won’t attach any mechanism for accessing the internet (neither an Internet Gateway nor a NAT Gateway).
- We’ll create three security groups: one for lambdas, one for the proxy, and one for the database instance. We’ll allow inbound access to the database security group only from entities using the proxy security group, and only allow inbound access to the proxy security group from instances using the lambda security group. This means that the lambdas (or any other instance) won’t be able to talk to the database directly—access will be mediated exclusively by the proxy, and only when using the lambda security group.
- All credentials will be managed by Secrets Manager: The RDS username and password will be auto-generated and encrypted, and both the proxy and lambdas will request access to this secret to connect. We’ll restrict and control access to this secret using IAM policies (block everything unless explicit permission is granted).
- We can’t access Secrets Manager from within a private VPC with no internet access, so we’ll create and attach an endpoint that enables access to the service from within any of our subnets.
- The design shown above uses a single Lambda function. We’ll do something very, very, very ugly: The lambda will be in charge of providing data to the only URL in the API Gateway (
<base_url>/poke_data) AND at the same time it will be in charge of seeding the database. This is a terrible thing you should never do in a professional setting, but the goal of this lab is to provide you with a system you can easily deploy and run, so we’ll look the other way this time.
Now that we understand all relevant design choices, we can start building our stack!
Building the Solution
Project Creation
First, we need the regular project setup we’ve become accustomed to.
Create an empty folder (I named mine APIGatewayWithProxiedRDS) and run cdk init app --language typescript inside it.
This next change is optional, but the first thing I do after creating a new CDK project is head into the bin folder and rename the app file to main.ts. Then I open the cdk.json file and edit the app config:
{
  "app": "npx ts-node --prefer-ts-exts bin/main.ts",
  "watch": {
    ...
  }
}
Now your project will recognize main.ts as the main application file. You don’t have to do this—I just like having a file named main serving as the main app file.
Stack Imports
From looking at the diagram, we know we’ll need the following imports at the top of the stack:
import * as cdk from "aws-cdk-lib";
import { Construct } from "constructs";
import { aws_rds as rds } from "aws-cdk-lib";
import { aws_ec2 as ec2 } from "aws-cdk-lib";
import { aws_lambda as lambda } from "aws-cdk-lib";
import { aws_secretsmanager as secrets } from "aws-cdk-lib";
import { aws_apigatewayv2 as gateway } from "aws-cdk-lib";
import { aws_apigatewayv2_integrations as api_integrations } from "aws-cdk-lib";
Creating the Network and the Security Groups
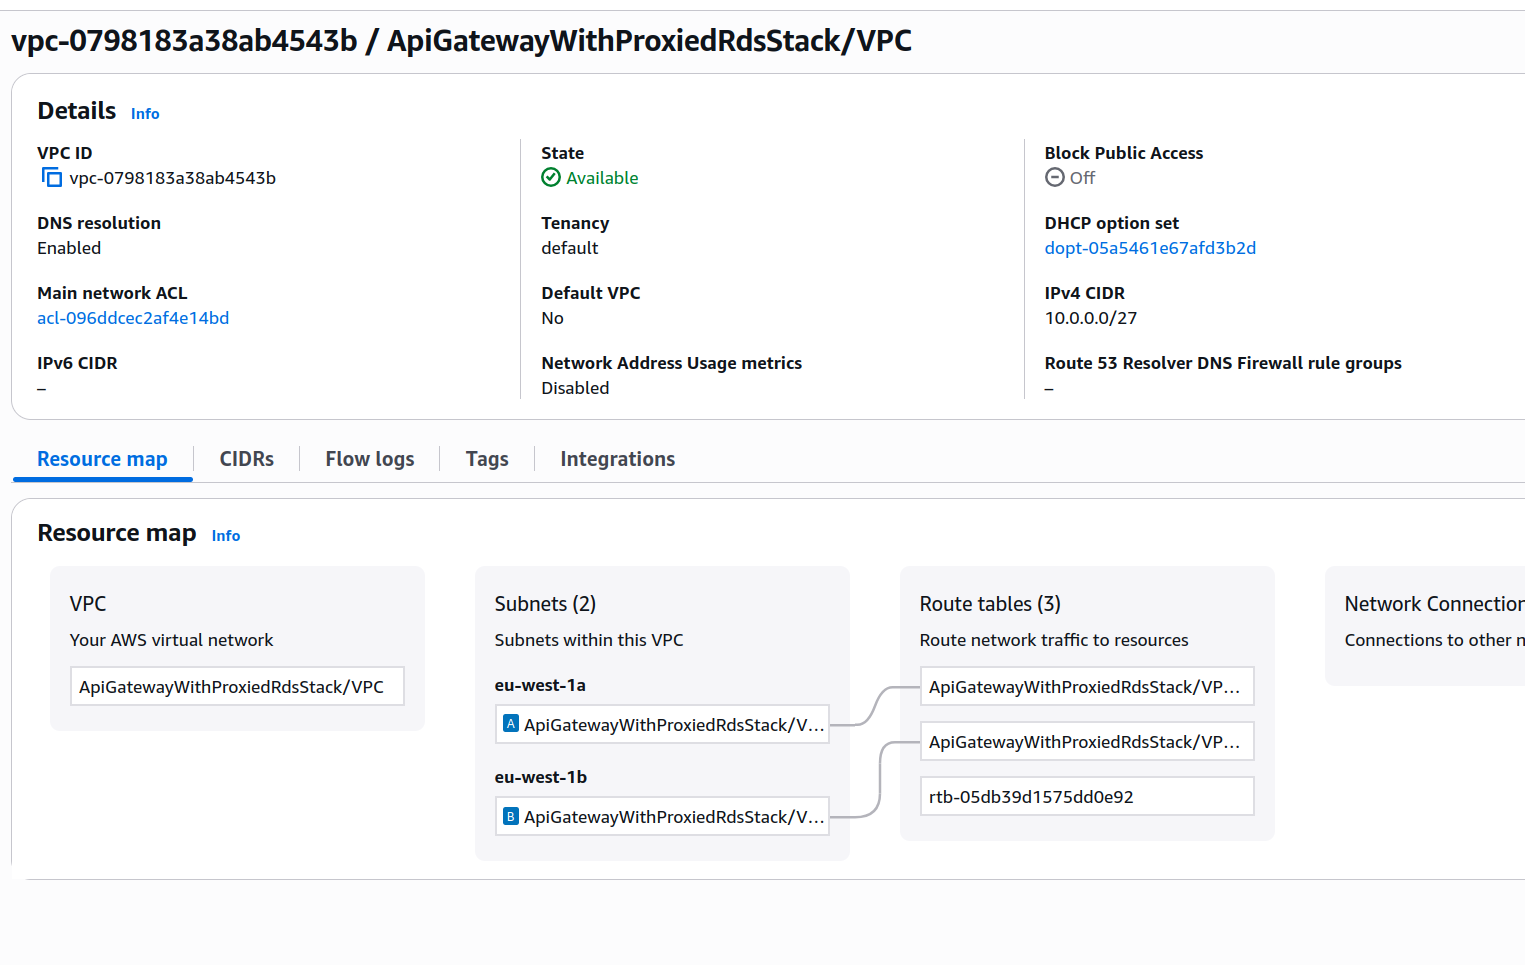
const vpc = new ec2.Vpc(this, "VPC", {
  ipAddresses: ec2.IpAddresses.cidr("10.0.0.0/27"),
  createInternetGateway: false,
  natGateways: 0,
  maxAzs: 2,
  subnetConfiguration: [
    {
      cidrMask: 28,
      name: "rds-subnet",
      subnetType: ec2.SubnetType.PRIVATE_ISOLATED,
    },
  ],
});

vpc.addInterfaceEndpoint("secretsManagerEndpoint", {
  service: ec2.InterfaceVpcEndpointAwsService.SECRETS_MANAGER,
});
This section of code creates a VPC without a NAT Gateway and without an Internet Gateway. We’ll be running in at most two availability zones, and we also want subnets with the smallest possible size allowed for a VPC subnet (a /28 CIDR). This means the CIDR for the VPC needs to be at least twice as big, so we define a /27 CIDR block for the whole network. If you need to brush up on your network knowledge about CIDRs, you can take a look at these docs.
Each subnet will have a total of 16 IPs, but only 11 of those will be usable. This happens because AWS reserves the first four and last (five in total) IPs of each subnet.
The VPC will look more or less like this:
The last step in the previous code block attaches an interface endpoint to enable access to Secrets Manager from within our private VPC.
The security groups are defined as follows:
const databaseSecurityGroup = new ec2.SecurityGroup(
  this,
  "databaseSecurityGroup",
  {
    vpc: vpc,
  }
);

const proxySecurityGroup = new ec2.SecurityGroup(
  this,
  "proxySecurityGroup",
  {
    vpc: vpc,
  }
);

const lambdaSecurityGroup = new ec2.SecurityGroup(
  this,
  "lambdaSecurityGroup",
  {
    vpc: vpc,
  }
);

databaseSecurityGroup.addIngressRule(proxySecurityGroup, ec2.Port.tcp(5432));
proxySecurityGroup.addIngressRule(lambdaSecurityGroup, ec2.Port.tcp(5432));
As discussed in the design section, we define three security groups: one for the database (databaseSecurityGroup), one for the proxy (proxySecurityGroup), and one for the lambdas (lambdaSecurityGroup).
When a security group is created, the default behavior is to block all inbound traffic, so in the last two lines we add a statement to ensure the proxy security group can access the database security group, and that the lambda security group can access the proxy security group. Both rules are for TCP traffic on port 5432 (the Postgres default connection port).
Those Subnets Seem Quite Small, No?
Yes, they are quite small—only 11 available IPs per subnet!
This used to be a problem, but in 2019 AWS announced an important set of changes:
- Because the network interfaces are shared across execution environments, typically only a handful of network interfaces are required per function. Every unique security group:subnet combination across functions in your account requires a distinct network interface. If a combination is shared across multiple functions in your account, we reuse the same network interface across functions.
- Your function scaling is no longer directly tied to the number of network interfaces and Hyperplane ENIs can scale to support large numbers of concurrent function executions
So, in short, we just need 1 IP per lambda+security group combination. The system itself will make sure that’s enough no matter how many concurrent execution environments are created. So yes, even our small subnets will be adequate for this scenario.
Creating the Secret
We need a secret for our database’s username and password. This is very easy to accomplish with CDK:
const dbAuthSecret = new secrets.Secret(this, "dbAuthSecret", {
  description: `Used as secret for database authentication on ${this.stackName}`,
  secretName: `${this.stackName}-db-auth`,
  generateSecretString: {
    secretStringTemplate: JSON.stringify({
      username: "postgres",
    }),
    generateStringKey: "password",
    excludePunctuation: true,
  },
});
We’re done! Now we can just reference this secret when creating our database instance and our proxy, and they’ll handle the config themselves.
Creating the RDS Instance and Attaching the Proxy
const database = new rds.DatabaseInstance(this, "Database", {
  engine: rds.DatabaseInstanceEngine.postgres({
    version: rds.PostgresEngineVersion.VER_17,
  }),
  instanceType: ec2.InstanceType.of(
    ec2.InstanceClass.T3,
    ec2.InstanceSize.MICRO
  ),
  vpc,
  vpcSubnets: {
    subnetType: ec2.SubnetType.PRIVATE_ISOLATED,
  },
  securityGroups: [databaseSecurityGroup],
  multiAz: false,
  allocatedStorage: 20,
  maxAllocatedStorage: 20,
  backupRetention: cdk.Duration.days(0),
  deletionProtection: false,
  databaseName: `demoProxiedDB`,
  credentials: rds.Credentials.fromSecret(dbAuthSecret),
});

const proxy = database.addProxy("rdsProxy", {
  secrets: [dbAuthSecret],
  vpc: vpc,
  vpcSubnets: {
    subnetType: ec2.SubnetType.PRIVATE_ISOLATED,
  },
  securityGroups: [proxySecurityGroup],
});
These two blocks are a bit longer than the previous ones, but there are only a handful of lines that are noteworthy. Most of it is just about making a very cheap database instance and attaching the proxy:
- When configuring the VPC subnets, we need to specify the type of subnets we want to attach both our database and proxy to. Because our network has only isolated private subnets, we use
ec2.SubnetType.PRIVATE_ISOLATED - We can associate multiple security groups to both the RDS instance and the proxy. In this case, we just select the corresponding security group for each one
- To use the secret on our RDS instance, we use the
credentialsproperty and a call tords.Credentials.fromSecret. For the proxy, we just pass the secret to thesecretsprop
Creating Our Lambda Function
We’ll write a single Lambda function using Python, meant to serve requests coming from the API Gateway’s single available URL:
import logging
import psycopg2
from psycopg2.extras import RealDictCursor
import os
import boto3
import json
import sys

logger = logging.getLogger()
logger.setLevel("INFO")

db_host = os.environ['DB_ENDPOINT']
secret = os.environ['SECRET']

secrets_client = boto3.client("secretsmanager")
response = secrets_client.get_secret_value(SecretId=secret).get('SecretString')
secrets = json.loads(response)

try:
    connection = psycopg2.connect(
        database=secrets['dbname'],
        user=secrets['username'],
        password=secrets['password'],
        host=db_host,
        port='5432',
        sslmode='require'
    )
    connection.autocommit = True
except psycopg2.Error as e:
    logger.error(e)
    sys.exit(1)


def handler(event, context):
    with connection.cursor(cursor_factory=RealDictCursor) as cursor:
        try:
            query = """SELECT * FROM poke_data"""
            cursor.execute(query)

            return {'statusCode': 200,
                    'headers': {'content-type': 'application/json'},
                    'body': json.dumps(cursor.fetchall())}
        except psycopg2.Error as err:
            logger.error(err)
            return {'statusCode': 500, 'body': "Error, check logs"}


def setup_db():
    with connection.cursor(cursor_factory=RealDictCursor) as cursor:
        try:
            table_exists_query = """SELECT * FROM information_schema.tables
                                    WHERE table_schema = current_schema()
                                    AND table_name = 'poke_data'
            """
            cursor.execute(table_exists_query)
            table_exists = cursor.fetchone()

            if not table_exists:
                table_create_query = """CREATE TABLE poke_data (
                                        dex_number INT,
                                        name VARCHAR(255),
                                        type VARCHAR(255)
                                        );
                    """
                cursor.execute(table_create_query)

                seed_query = """INSERT INTO poke_data
                                values
                                (1, 'Bulbasaur', 'Grass/Poison'),
                                (2, 'Ivysaur', 'Grass/Poison'),
                                (3, 'Venusaur', 'Grass/Poison'),
                                (4, 'Charmander', 'Fire');
                    """
                cursor.execute(seed_query)
        except psycopg2.Error as err:
            logger.error(err)


setup_db()
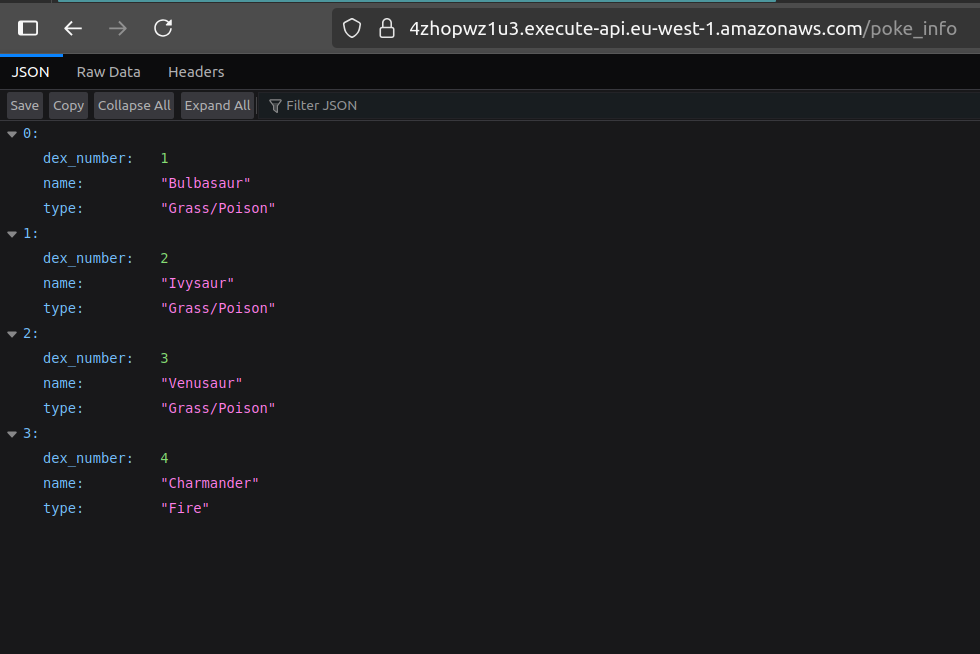
This function retrieves a few environment variables and uses them to retrieve the secret with database credentials, then uses them to create a psycopg2 client. The handler of the function executes a very simple query (SELECT * FROM poke_data) and returns that data to the caller—in this case, the gateway itself.
There’s another function called setup_db that’s responsible for creating the respective table and populating it with a few dummy values. This is a terrible approach and should not be replicated anywhere else—it’s just a very convenient hack for ensuring this example will work properly.
In the real world, you would have several options to choose from. Two of the most reasonable ones are:
- Use the default migration and seeding mechanism for your platform. If your system uses, for example, container images running Ruby on Rails, you can use the default
db:migrate,db:seed, ordb:setupcommands to make sure the database is in running form before serving requests. These mechanisms are usually idempotent and safe, so you can just make their execution part of the deployment step for your solution. - Use a custom resource in CDK. If there are no other options, you can safely define a custom resource in charge of running a setup script for your database and seeding it with some useful initial data. This approach is better integrated with an IaC workflow and is far safer than what we tried in our Python function.
Creating the CDK code for deploying our function is straightforward. The only noteworthy things are the installation of the psycopg2 module using bundling options, the attachment of the lambda security group, and the passing of environment variables with the proxy endpoint and the secret name:
const pokeInfoFunction = new lambda.Function(this, "pokeFN", {
  runtime: lambda.Runtime.PYTHON_3_13,
  code: lambda.Code.fromAsset("lambdas", {
    bundling: {
      image: lambda.Runtime.PYTHON_3_13.bundlingImage,
      command: [
        "bash",
        "-c",
        "pip install --no-cache psycopg2-binary -t /asset-output && cp -au . /asset-output",
      ],
    },
  }),
  timeout: cdk.Duration.seconds(30),
  handler: "poke_list.handler",
  vpc: vpc,
  securityGroups: [lambdaSecurityGroup],
  environment: {
    DB_ENDPOINT: proxy.endpoint,
    SECRET: dbAuthSecret.secretName,
  },
  description: "Provides a list of Pokémon for the pokeDataAPI API",
});
Creating the API Gateway
This one is just a simple HTTP API with a single Lambda integration:
const pokeDataAPI = new gateway.HttpApi(this, "pokeDataAPI");

pokeDataAPI.addRoutes({
  path: "/poke_info",
  methods: [gateway.HttpMethod.GET],
  integration: new api_integrations.HttpLambdaIntegration(
    "lpIntegration",
    pokeInfoFunction
  ),
});
Permissions and Extra Configuration
We need two things:
- Make sure the Lambda function has read access to the secret.
- Create a convenient output that shows us the API URL after deployment.
Achieving this with CDK is very easy:
dbAuthSecret.grantRead(pokeInfoFunction);

new cdk.CfnOutput(this, "APIEndpoint", { value: pokeDataAPI.apiEndpoint });
Testing the Solution
After running cdk deploy, you can visit the <base_url>/poke_info path, where base_url is whatever output value APIEndpoint is assigned when the deployment completes.
IMPORTANT! Always remember to delete your stack by running cdk destroy or deleting it manually in the console.
Improvements and Experiments
- Try to come up with a better solution for setting up the database after deployment, and take that logic out of the Lambda function
- Reproduce this same architecture, but instead of attaching the proxy to the primary instance of a database, try to attach the proxy to a read replica. Is this even possible? Why would this be a good or bad idea?
- Build your own Lambda/RDS-backed API Gateway using the tools you learned in this lab, and provide a few more resources and actions to the user.
The goal of this lab was teaching you about a common mindset you have to adopt when designing cloud solutions: Pay attention to the differences in how different parts of your systems can scale up or down, and what implications these differences can have. Fortunately, most of the problems you’re likely to encounter already have a solution in the form of best practices or special software that bypasses the limitation.
Here’s the key takeaway: always think about your system’s scalability and reliability both at the component level and in how those components talk to each other. Master this approach, and you’ll become a much more effective architect while avoiding tons of future headaches
I hope you find this useful!