The source code for this article can be found here.
Welcome to another cloud experiment! The idea behind these hands-on tutorials is to provide practical experience building cloud-native solutions of different sizes using AWS services and CDK. We’ll focus on developing expertise in Infrastructure as Code, AWS services, and cloud architecture while understanding both the “how” and “why” behind our choices.
Securing Access to an API
This time, you’re tasked with securing access to an API in a flexible way that can accommodate future requirement changes. Your company is running an important API that’s currently accessible to anyone who knows its URL, and you need to limit who can access this data. The only problem? The product is relatively new, and the mechanisms used to verify user identity are prone to change. You need to limit access in a way that’s easy to change when more elaborate forms of authentication are required.
The Current Setup
First, let’s emulate an already existing API by creating a simple Lambda-backed API Gateway deployment:
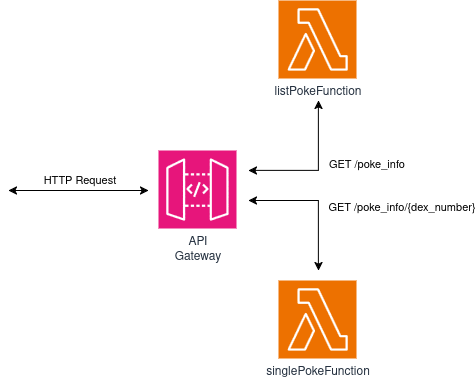
This API, critical to the company’s success, returns data about the original batch of Pokémon—just the ones in the first gen (I somehow always manage to sneak them into tutorials, man I gotta stop doing that). We’ll build this API using CDK, with each request backed by a Lambda function. The API supports only two URLs:
- /poke_info: Returns data for every single entity in the system.
- /poke_info/{dex_number}: Returns data about a specific entity based on their Pokédex number (a
dex_number: 1would return data for Bulbasaur). If the dex_number doesn’t correspond to any entity, it returns an empty response.
Now let’s build the API. First, we need the regular project setup we’ve become accustomed to.
Create an empty folder (I named mine APIGatewayWithLambdaAuthorization) and run cdk init app --language typescript inside it.
This next change is optional, but the first thing I do after creating a new CDK project is head into the bin folder and rename the app file to main.ts. Then I open the cdk.json file and edit the app config:
{
  "app": "npx ts-node --prefer-ts-exts bin/main.ts",
  "watch": {
    ...
  }
}
Now your project will recognize main.ts as the main application file. You don’t have to do this—I just like having a file named main serving as the main app file.
Creating the Lambda Functions
Create a folder called lambdas at the project’s root level (alongside bin and lib), and within it create another folder called api, with two files: poke.py and poke_list.py.
For lambdas/api/poke.py:
import logging
import json

logger = logging.getLogger()
logger.setLevel("INFO")

with open('pokedata.json', 'r') as file:
    dex_data = json.load(file)


def handler(event, context):
    dex_number = event.get('pathParameters', {}).get('dex_number', '')

    logger.info(f"Serving request for pk#{dex_number}")
    return {'statusCode': 200,
            'headers': {'content-type': 'application/json'},
            'body': json.dumps(dex_data.get(dex_number, {}))}
For lambdas/api/poke_list.py:
import logging
import json

logger = logging.getLogger()
logger.setLevel("INFO")

with open('pokedata.json', 'r') as file:
    dex_data = json.load(file)


def handler(event, context):
    logger.info("Serving request for all pk")
    return {'statusCode': 200,
            'headers': {'content-type': 'application/json'},
            'body': json.dumps(dex_data)}
Both are dummy functions that pull data from a local JSON file and use it to serve API Gateway requests. In real life, your functions would query a data store for actual live data, but I’m keeping it simple so we can focus on authentication.
Building the Stack
Now we’ll write CDK code to create the solution described above:
import * as cdk from "aws-cdk-lib";
import { Construct } from "constructs";
import { aws_lambda as lambda } from "aws-cdk-lib";
import { aws_apigatewayv2 as gateway } from "aws-cdk-lib";
import { aws_apigatewayv2_integrations as api_integrations } from "aws-cdk-lib";


export class ApiGatewayWithLambdaAuthorizationStack extends cdk.Stack {
  constructor(scope: Construct, id: string, props?: cdk.StackProps) {
    super(scope, id, props);

    const pokeDataAPI = new gateway.HttpApi(this, "pokeDataAPI");

    const singlePokeFunction = new lambda.Function(this, "spLambda", {
      runtime: lambda.Runtime.PYTHON_3_13,
      code: lambda.Code.fromAsset("lambdas/api"),
      handler: "poke.handler",
      description: `Provides a single pkm for the ${pokeDataAPI.httpApiName} API`,
    });

    const listPokeFunction = new lambda.Function(this, "lpLambda", {
      runtime: lambda.Runtime.PYTHON_3_13,
      code: lambda.Code.fromAsset("lambdas/api"),
      handler: "poke_list.handler",
      description: `Provides a list of pkm for the ${pokeDataAPI.httpApiName} API`,
    });

    pokeDataAPI.addRoutes({
      path: "/poke_info/{dex_number}",
      methods: [gateway.HttpMethod.GET],
      integration: new api_integrations.HttpLambdaIntegration(
        "spIntegration",
        singlePokeFunction
      ),
    });

    pokeDataAPI.addRoutes({
      path: "/poke_info",
      methods: [gateway.HttpMethod.GET],
      integration: new api_integrations.HttpLambdaIntegration(
        "lpIntegration",
        listPokeFunction
      ),
    });

    new cdk.CfnOutput(this, "APIEndpoint", { value: pokeDataAPI.apiEndpoint });
  }
}
Let’s quickly review what we just wrote:
- We build an API Gateway by calling the constructor for
HttpApi. We’re using the V2 collection of API Gateway constructs, which gives us access to HTTP APIs and other new features. - We create two Lambda functions with the Python code from the previous step. These functions have no external dependencies, so we can use the default Lambda Python 13 runtime without additional bundling instructions.
- We create two routes in our API:
poke_info/{dex_number}andpoke_info, associated withsinglePokeFunctionandlistPokeFunctionrespectively. We useHttpLambdaIntegrationto connect them and respond only to GET requests. - Finally, we add a CloudFormation output to receive the API URL in our terminal once deployment completes. This isn’t required, but it’s useful when testing solutions.
After running cdk deploy, you’ll get a CF output like this:
Outputs:
ApiGatewayWithLambdaAuthorizationStack.APIEndpoint = https://jgr2iirikk.execute-api.eu-west-1.amazonaws.com
Yours will be different, so replace it with your stack’s URL when executing the following commands. Also, remember to add the JSON file with the Pokémon data to your project—you can find it alongside the Python handler files in the project’s repo.
Testing Our API
Now we can test that everything works! We’ll use CURL to make requests to our endpoint.
A GET request to the poke_info resource:
$ curl https://jgr2iirikk.execute-api.eu-west-1.amazonaws.com/poke_info
{
  "1": {"name": "Bulbasaur", "number": "1", "types": "Grass/Poison"},
  "2": {"name": "Ivysaur", "number": "2", "types": "Grass/Poison"},
  "3": {"name": "Venusaur", "number": "3", "types": "Grass/Poison"},
  "4": {"name": "Charmander", "number": "4", "types": "Fire"},
  "5": {"name": "Charmeleon", "number": "5", "types": "Fire"},
  "6": {"name": "Charizard", "number": "6", "types": "Fire/Flying"},
  "7": {"name": "Squirtle", "number": "7", "types": "Water"},
  "8": {"name": "Wartortle", "number": "8", "types": "Water"},
  "9": {"name": "Blastoise", "number": "9", "types": "Water"},
  "10": {"name": "Caterpie", "number": "10", "types": "Bug"},
  "11": {"name": "Metapod", "number": "11", "types": "Bug"},
...
}
A GET request to the poke_info/{dex_number} resource’s 9th entity:
$ curl https://jgr2iirikk.execute-api.eu-west-1.amazonaws.com/poke_info/9
{
 "name": "Blastoise",
 "number": "9",
 "types": "Water"
}
Perfect! Everything works as expected. Now let’s focus on making sure not everyone on the internet can access this super important API.
Designing a Flexible Authorization Solution
We need a flexible authorization mechanism we can customize to support changing requirements we still know little about. Thankfully, there’s a simple way to achieve this with API Gateways: Lambda Authorizers.
The idea is to use a Lambda function to process requests as they hit the gateway, delegating the authorization process to the logic in its handler. This lets you do virtually anything when authorizing requests, offering a robust and flexible solution to our problem.
The revised design of our stack:
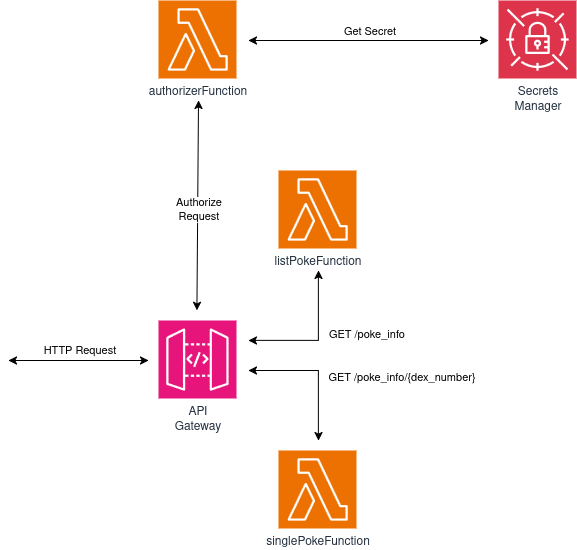
The plan is to create a secret with our stack deployment, then verify each API request by matching the authorization header with the secret value. If they match, we authorize the request. If not, we deny access. We isolate the authorization logic within our function, so changes in requirements will have limited impact and result only on changes for our Lambda.
In the lambdas folder, create another folder called authorizer with a file called authorizer.py:
import os
import boto3

secret = os.environ['SECRET_NAME']
secrets_client = boto3.client("secretsmanager")
secret_api_key = secrets_client.get_secret_value(
    SecretId=secret).get('SecretString')


def handler(event, context):
    response = {"isAuthorized": False}

    try:
        if (event["headers"]["authorization"] == secret_api_key):
            response = {
                "isAuthorized": True,
            }
            return response
        else:
            return response
    except BaseException:
        return response
This function:
- Retrieves the secret value we’ll use for authorization and creates a Secrets Manager client to get it.
- Sets the default response to deny every request.
- If the
authorizationheader matches the secret key, it authorizes access to the API. Otherwise, it denies access. - If an exception occurs, it returns the default response and denies access.
We’re using the Simple Response Type since we only need to validate a simple header, but you can use a different response scheme for complex authentication scenarios.
Now we can edit our stack definition. First, add two new imports:
import { aws_secretsmanager as secrets } from "aws-cdk-lib";
import { aws_apigatewayv2_authorizers as api_auth } from "aws-cdk-lib";
Then add the following code blocks:
// Here we defined the two lambda functions serving the gateway's requests

const authorizerSecret = new secrets.Secret(this, "authorizerSecret", {
  description: `Used as secret for authorizing requests hitting: ${pokeDataAPI.httpApiName}`,
});

const authorizerFunction = new lambda.Function(
  this,
  "authorizerFunction",
  {
    runtime: lambda.Runtime.PYTHON_3_13,
    code: lambda.Code.fromAsset("lambdas/authorizer"),
    handler: "authorizer.handler",
    environment: {
      SECRET_NAME: authorizerSecret.secretName,
    },
    description: `Implements Lambda authorization for: ${pokeDataAPI.httpApiName}`,
  }
);

const httpAuthorizer = new api_auth.HttpLambdaAuthorizer(
  "httpAuthorizer",
  authorizerFunction,
  {
    responseTypes: [api_auth.HttpLambdaResponseType.SIMPLE],
  }
);

pokeDataAPI.addRoutes({
  path: "/poke_info/{dex_number}",
  methods: [gateway.HttpMethod.GET],
  integration: new api_integrations.HttpLambdaIntegration(
    "spIntegration",
    singlePokeFunction
  ),
  authorizer: httpAuthorizer, // <- THIS IS NEW
});

pokeDataAPI.addRoutes({
  path: "/poke_info",
  methods: [gateway.HttpMethod.GET],
  integration: new api_integrations.HttpLambdaIntegration(
    "lpIntegration",
    listPokeFunction
  ),
  authorizer: httpAuthorizer, // <- THIS IS NEW
});

authorizerSecret.grantRead(authorizerFunction);

// Here we defined the CfnOutput
This code:
- Creates a secret in Secrets Manager—we’ll use this as our auth token.
- Creates a Lambda function with our authorization code, then creates an
HttpLambdaAuthorizerbound to our authorization Lambda using the simple response type. - Passes the authorizer to each route’s authorizer property. You don’t need to run the authorizer on every action, but we decided to secure both routes.
- Grants the authorizer Lambda read access to the secret we just created.
Ready to test the final version! Run cdk deploy and we’ll be set.
Testing Our Complete Solution
Without any changes, running the previous commands gives us:
$ curl https://jgr2iirikk.execute-api.eu-west-1.amazonaws.com/poke_info
{"message":"Unauthorized"}

$ curl https://jgr2iirikk.execute-api.eu-west-1.amazonaws.com/poke_info/9
{"message":"Unauthorized"}
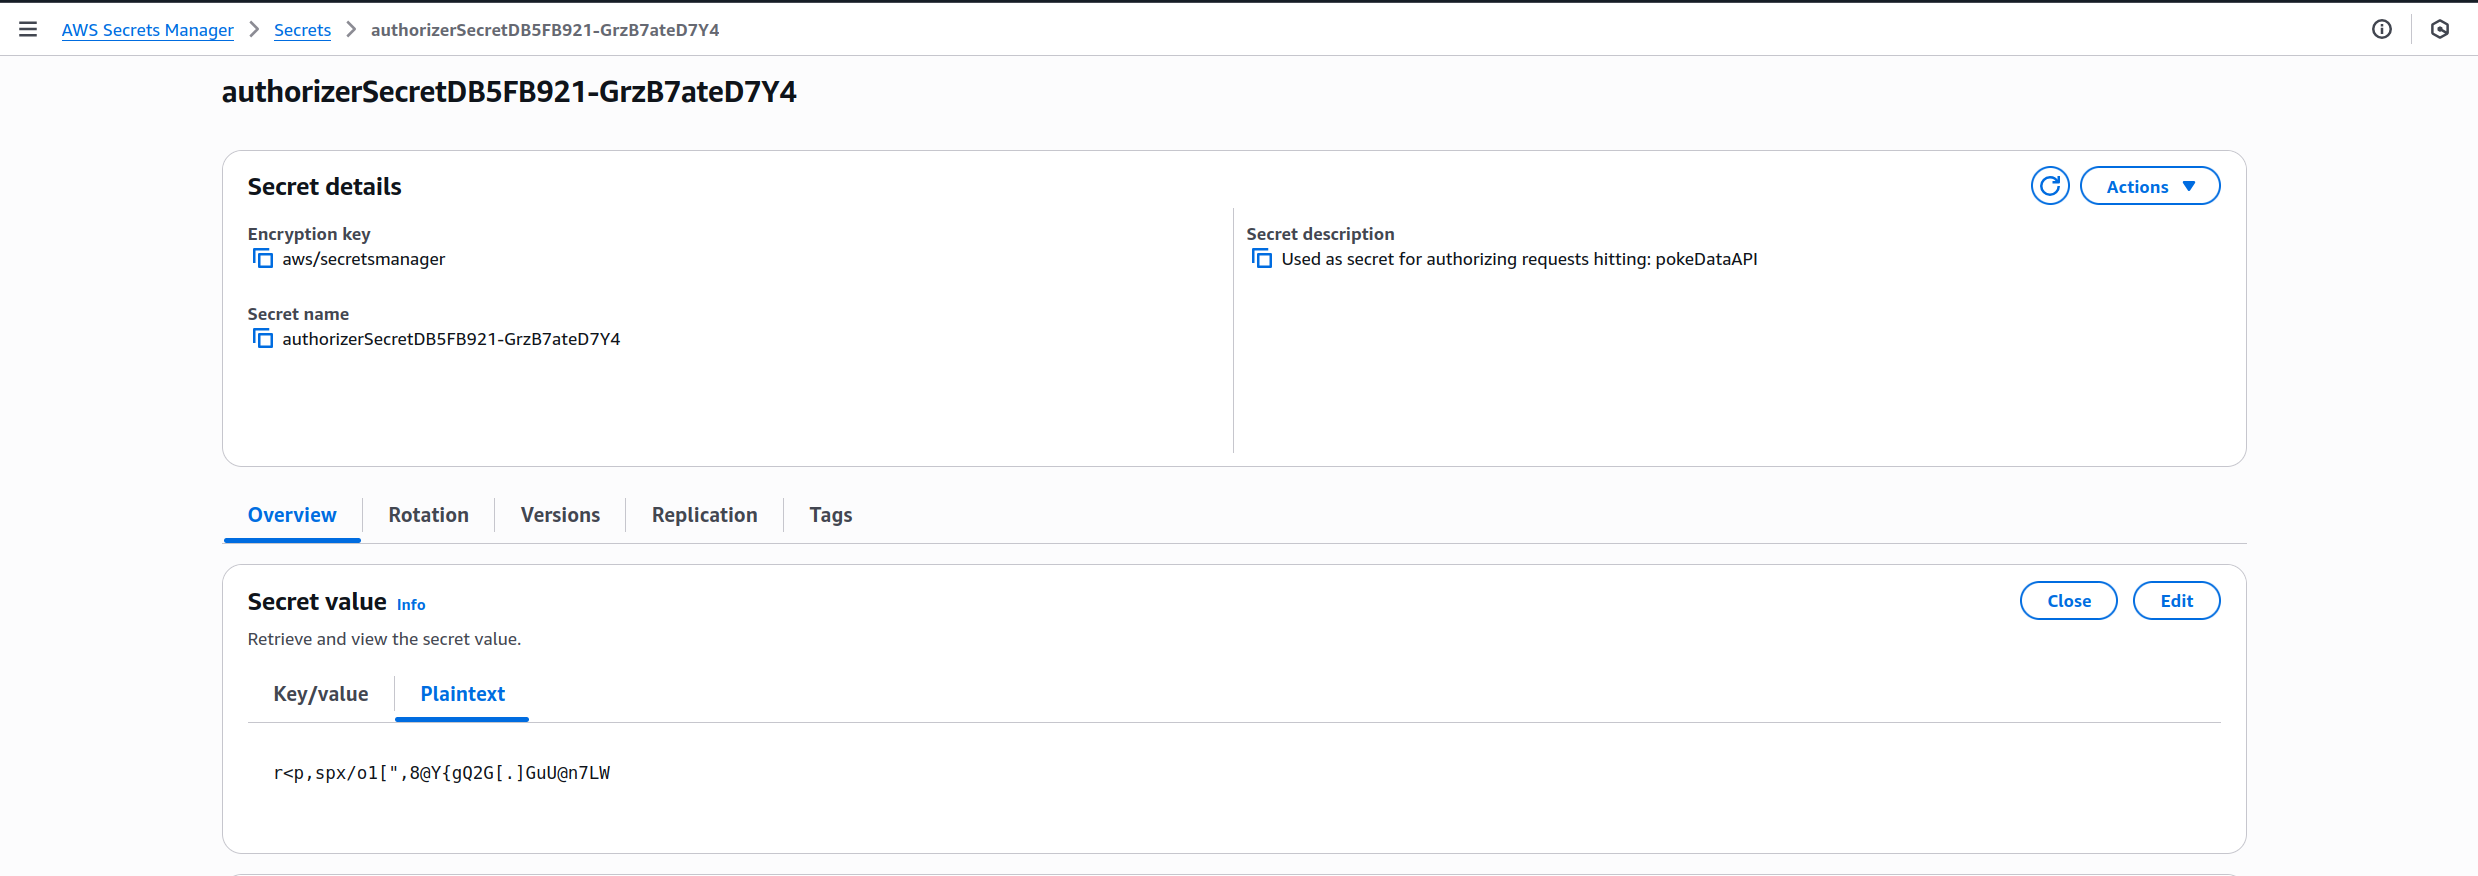
Perfect! Our request lacks the auth token, so it receives an Unauthorized response. Let’s retrieve our token and add it to the header. You can find it in your account’s Secrets Manager—mine looked like this:
Now we can add the header to our curl calls using -H and test whether they work:
$ curl -H "Authorization: r<p,spx/o1[\",8@Y{gQ2G[.]GuU@n7LW" https://jgr2iirikk.execute-api.eu-west-1.amazonaws.com/poke_info/9
{
  "name": "Blastoise",
  "number": "9",
  "types": "Water"}


$ curl -H "Authorization: r<p,spx/o1[\",8@Y{gQ2G[.]GuU@n7LW" https://jgr2iirikk.execute-api.eu-west-1.amazonaws.com/poke_info
{
  "1": {"name": "Bulbasaur", "number": "1", "types": "Grass/Poison"},
  "2": {"name": "Ivysaur", "number": "2", "types": "Grass/Poison"},
  "3": {"name": "Venusaur", "number": "3", "types": "Grass/Poison"},
  "4": {"name": "Charmander", "number": "4", "types": "Fire"},
  "5": {"name": "Charmeleon", "number": "5", "types": "Fire"},
  "6": {"name": "Charizard", "number": "6", "types": "Fire/Flying"},
  "7": {"name": "Squirtle", "number": "7", "types": "Water"},
  "8": {"name": "Wartortle", "number": "8", "types": "Water"},
  "9": {"name": "Blastoise", "number": "9", "types": "Water"},
  "10": {"name": "Caterpie", "number": "10", "types": "Bug"},
  "11": {"name": "Metapod", "number": "11", "types": "Bug"},
...
}
They work!
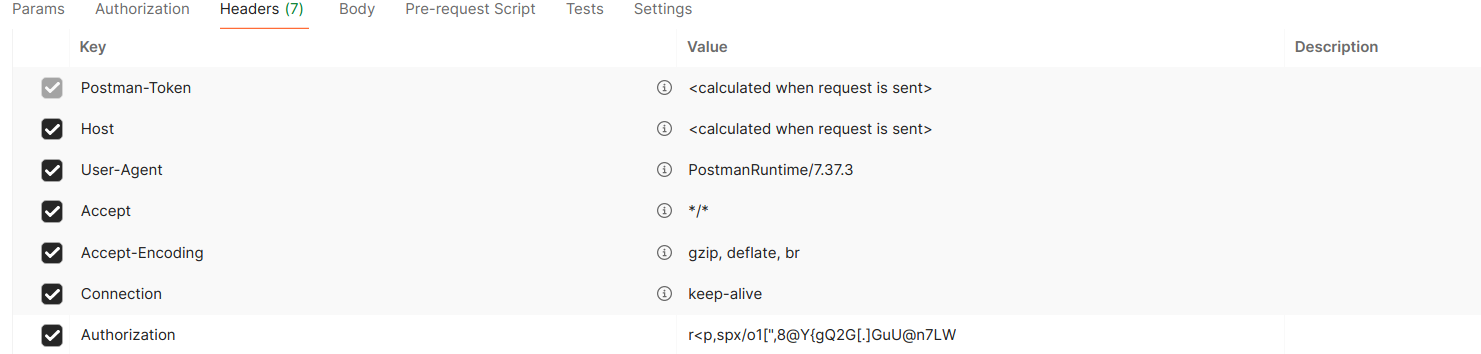
Remember that your secret may contain characters you need to escape. Mine had a “ that needed escaping. You can use a more sophisticated tool like Postman or Insomnia for testing your API—that way you won’t need to escape special characters:
With this, we can conclude that we managed to secure our API, and it wasn’t even that difficult. The authorizer function is quite simple at the moment, but I’m sure you can already start thinking on some more elaborate authorization flows.
IMPORTANT! Always remember to delete your stack by running cdk destroy or deleting it manually in the console.
Improvements and Experiments
- Inspect your API Gateway and find where the authorization Lambda response cache duration is configured (auth Lambda responses are cached for performance). What are the advantages and disadvantages of setting this to a low value?
- Try creating a version of our authorizer that uses
api_auth.HttpLambdaResponseType.IAMinstead ofapi_auth.HttpLambdaResponseType.SIMPLE. - Using a single unchanging token for authorization isn’t ideal. How would you update the authorizer logic to validate temporary tokens produced by other AWS services?
- Modify the authorizer code to also validate the IP of the entity sending the request. Try two approaches:
- Validate both IP and authorization token
- If the IP matches a specific value, ignore the token requirement (the IP has privileged access)
- Modify the Lambda function to validate the request’s user agent and only allow requests from modern web browsers.
- Edit the stack to receive (as props) a list of allowed IPs and only allow requests from those IPs.
These experiments will keep you busy for a weekend or longer! The advantage of having such a flexible and customizable authorization mechanism is huge—it allows you to support almost any authorization requirement you can think of.
This lab differed from previous ones in that it focused on enhancing an existing solution rather than building one from scratch. It demonstrated that significant system improvements can often be achieved without major changes—simply by using the right tools effectively. Today, you learned a technique that can help you do just that.
I hope you find this useful!