The source code for this article can be found here.
Welcome to another cloud experiment! The idea behind these hands-on tutorials is to provide practical experience building cloud-native solutions of different sizes using AWS services and CDK. We’ll focus on developing expertise in Infrastructure as Code, AWS services, and cloud architecture while understanding both the “how” and “why” behind our choices.
A Single Interface
I like monoliths. They’re easy to package and deploy, and when using good architectural patterns and design principles, they’re also easy to understand and maintain.
I also know that for many scenarios, a monolith probably isn’t the best option. Some cases are better served by architectures that use a more granular approach—whether that’s microservices, serverless, or even a combination of both. These solutions often benefit from providing a single entry point for all the services that make up the application.
The main advantage of this approach is that from the perspective of the entities using your service, there’s a well-defined interface they can rely on. This layer acts as a protective boundary that isolates your backend and grants you the flexibility to split functionality however you see fit.
In this lab, we’re going to learn how to hide the implementation details of our backend behind a single entity: an API Gateway. Here’s what we’ll build:
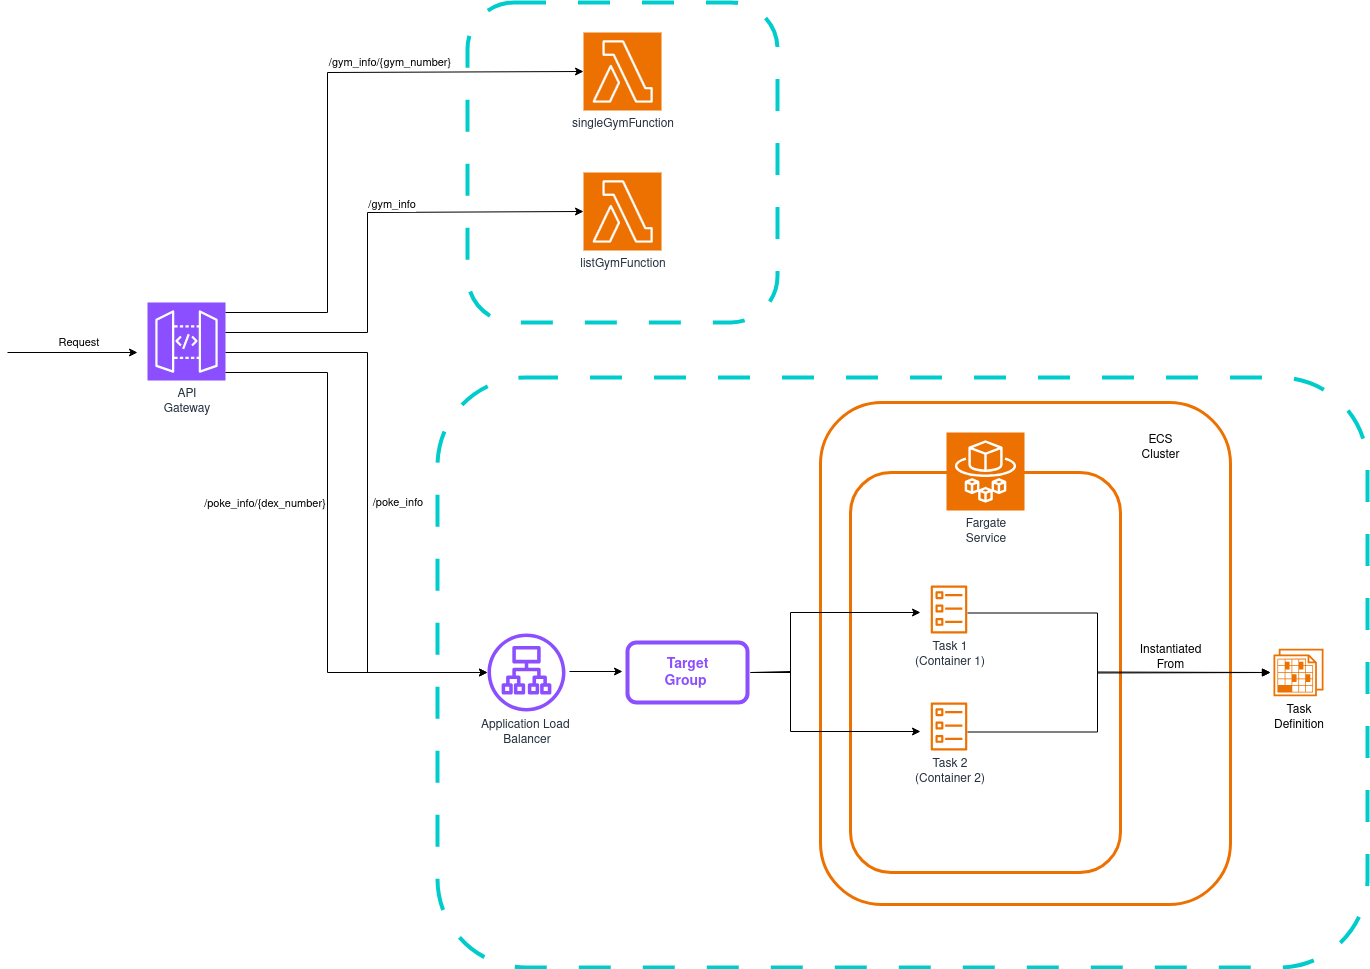
We’ll provide an API that returns data about the first generation of Pokémon games, implementing these actions:
- /gym_info: Returns information about all original gyms
- /gym_info/{gym_number}: Query data for a specific gym
- /poke_info: Returns information about all 1st gen Pokémon
- /poke_info/{dex_number}: Query data for a specific Pokémon
The gym endpoints will be handled by Lambda functions, while the Pokémon endpoints will be served by a load-balanced ECS cluster running on Fargate. The API Gateway will route requests to the appropriate compute resources. A nice mix of lambdas and containers!
Let’s get started!
Writing the Backend
Lambda Functions
We’ll need two Lambda functions to provide data for the /gym_info and /gym_info/{gym_number} paths. We’ll write them in Python:
For gym_list.py:
import logging
import json

logger = logging.getLogger()
logger.setLevel("INFO")

with open('gym_data.json', 'r') as file:
    gym_data = json.load(file)


def handler(event, context):
    logger.info("Serving request for all gyms")
    return {
        'statusCode': 200,
        'headers': {'content-type': 'application/json'},
        'body': json.dumps(gym_data)
    }
And for gym.py:
import logging
import json

logger = logging.getLogger()
logger.setLevel("INFO")

with open('gym_data.json', 'r') as file:
    gym_data = json.load(file)


def handler(event, context):
    gym_number = event.get('pathParameters', {}).get('gym_number', '')

    logger.info(f"Serving request for gym#{gym_number}")
    return {
        'statusCode': 200,
        'headers': {'content-type': 'application/json'},
        'body': json.dumps(gym_data.get(gym_number, {}))
    }
These are simple functions that return data from a JSON file. Normally, you’d use a database to store the data, but for this lab, we’ll keep it simple.
The Pokémon Data Application
We need an app we can containerize to test our stack and provide data for the /poke_info and /poke_info/{dex_number} paths. We’ll create a small Sinatra application with three routes: the two described above, plus the root.
Create a folder called app, and within it create a Gemfile with these contents:
source 'https://rubygems.org'
gem 'sinatra'
gem 'rackup'
gem 'puma'
Now create the main app file. Next to the Gemfile, create app.rb:
# frozen_string_literal: true

require 'sinatra'
require 'json'

set :port, 4567
set :bind, '0.0.0.0'

POKE_DATA = JSON.load File.open 'pokedata.json'

before do
  content_type :json
end

get '/' do
  {
    data: {status: 'All Good'},
    source: ENV['HOSTNAME']
  }
end

get '/poke_info' do
  {
    data: POKE_DATA,
    source: ENV['HOSTNAME']
  }
end

get '/poke_info/:dex_number' do
  {
    data: POKE_DATA[params[:dex_number]],
    source: ENV['HOSTNAME']
  }
end

after do
  response.body = JSON.dump(response.body)
end
Like the Lambda functions, this app simply returns data from a JSON file. We include an extra source field to verify that load balancing is working as expected and that multiple containers are serving requests.
Finally, write a Dockerfile for building our application’s Docker image:
# Dockerfile
FROM ruby:3.3
ENV APP_ENV=production
WORKDIR /app
COPY . /app
RUN bundle install
EXPOSE 4567
CMD ["ruby", "app.rb"]
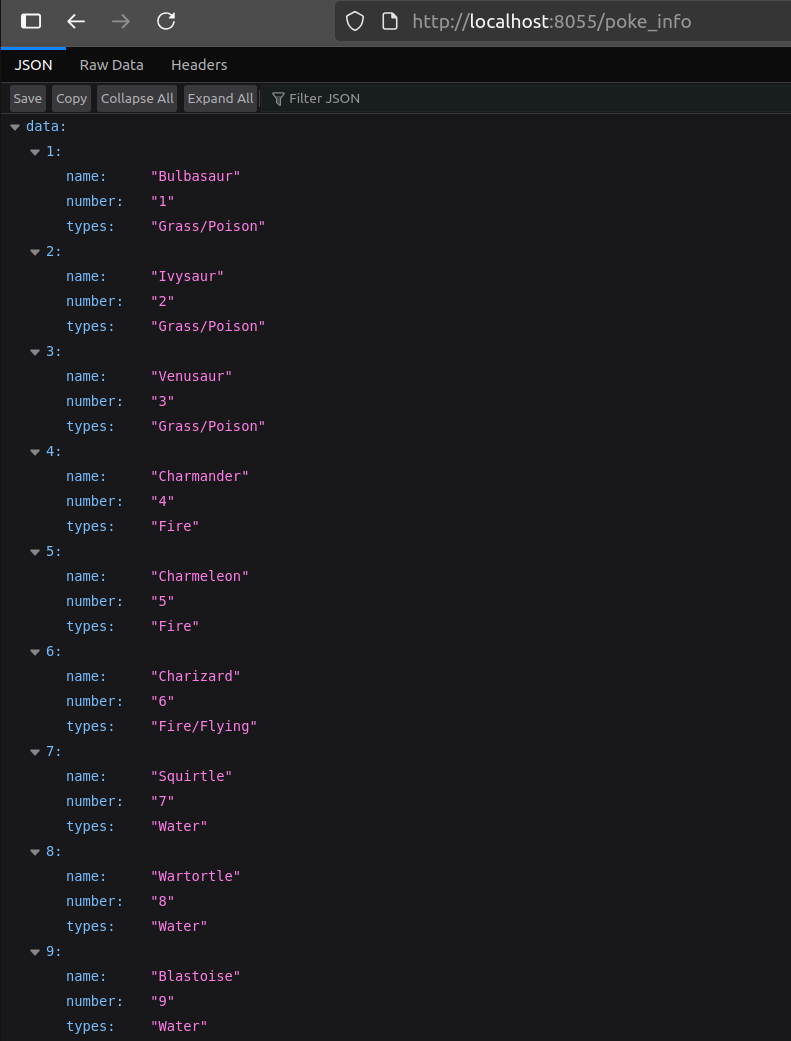
You can copy the app from the lab’s repo if you prefer. If you want to test it locally, run docker build --tag 'sample-sinatra' . to create the container image, then docker run -p 8055:4567 sample-sinatra. This will serve the app on localhost at port 8055:
Building Our Stack
Project Creation
First, we need our regular project setup.
Create an empty folder (I named mine APIGatewayPattern) and run cdk init app --language typescript inside it.
This next change is optional, but the first thing I do after creating a new CDK project is navigate to the bin folder and rename the app file to main.ts. Then I open cdk.json and edit the app config:
{
  "app": "npx ts-node --prefer-ts-exts bin/main.ts",
  "watch": {
    ...
  }
}
Now your project will recognize main.ts as the main application file. You don’t have to do this—I just like having a file named main as the entry point.
Creating the Base Stack
We’ll delegate the creation of compute resources to custom constructs. The main stack will create the API Gateway and instantiate each construct. The blue squares in the diagram represent the contents of each custom construct.
Our main stack is extremely simple:
import * as cdk from 'aws-cdk-lib';
import { Construct } from 'constructs';
import { aws_apigatewayv2 as gateway } from "aws-cdk-lib";
import { GymAPIConstruct } from "../constructs/gym_api";
import { PokeAPIConstruct } from "../constructs/poke_api";

export class ApiGatewayPatternStack extends cdk.Stack {
  constructor(scope: Construct, id: string, props?: cdk.StackProps) {
    super(scope, id, props);

    const myApi = new gateway.HttpApi(this, "myApi");
    const gymAPI = new GymAPIConstruct(this, "gymApi", { httpApiGateway: myApi });
    const pokeAPI = new PokeAPIConstruct(this, "pokeApi", { httpApiGateway: myApi });

    new cdk.CfnOutput(this, "APIEndpoint", { value: myApi.apiEndpoint });
  }
}
The API Gateway is passed as a parameter to each construct. Each construct creates the resources it needs and wires them up so the API Gateway can route requests to the appropriate compute entity.
The final line creates an output with the API Gateway’s endpoint, so you can test it immediately after deployment.
Creating the Lambda-Based Construct
By now, you should have a lambdas folder at the same level as bin and lib. Inside it, place your gym_list.py and gym.py files. Create a constructs folder and inside it, create gym_api.ts:
import { Construct } from 'constructs';
import { aws_apigatewayv2 as gateway } from "aws-cdk-lib";
import { aws_apigatewayv2_integrations as api_integrations } from "aws-cdk-lib";
import { aws_lambda as lambda } from "aws-cdk-lib";

export interface GymAPIConstructProps {
  httpApiGateway: gateway.HttpApi;
}

export class GymAPIConstruct extends Construct {
  constructor(scope: Construct, id: string, props: GymAPIConstructProps) {
    super(scope, id);

    const myApi = props.httpApiGateway;

    const singleGymFunction = new lambda.Function(this, "sgLambda", {
      runtime: lambda.Runtime.PYTHON_3_13,
      code: lambda.Code.fromAsset("lambdas"),
      handler: "gym.handler",
      description: `Provides a single gym for the ${myApi.httpApiName} API`,
    });

    const listGymFunction = new lambda.Function(this, "lgLambda", {
      runtime: lambda.Runtime.PYTHON_3_13,
      code: lambda.Code.fromAsset("lambdas"),
      handler: "gym_list.handler",
      description: `Provides a list of gyms for the ${myApi.httpApiName} API`,
    });

    myApi.addRoutes({
      path: "/gym_info/{gym_number}",
      methods: [gateway.HttpMethod.GET],
      integration: new api_integrations.HttpLambdaIntegration(
        "sgIntegration",
        singleGymFunction
      )
    });

    myApi.addRoutes({
      path: "/gym_info",
      methods: [gateway.HttpMethod.GET],
      integration: new api_integrations.HttpLambdaIntegration(
        "lgIntegration",
        listGymFunction
      )
    });
  }
}
Let’s note the most interesting aspects of this code:
- We define custom props for this construct via
GymAPIConstructProps—the only prop needed is the API Gateway - We create two Lambda functions, one for each route
- We add both Lambda functions to the API Gateway using the
addRoutesmethod - We pass the Lambda functions to the
HttpLambdaIntegrationconstruct, which creates the integration between the API Gateway and Lambda
The procedure is similar to what we’ve done in other experiments, so there’s nothing we haven’t seen before. The important part is that we’re now organizing this functionality into a custom construct!
Creating the ECS-Based Construct
Create poke_api.ts in the constructs folder:
import { Construct } from 'constructs';
import { aws_apigatewayv2 as gateway, aws_apigatewayv2_integrations as api_integrations } from "aws-cdk-lib";
import { aws_ecs as ecs } from "aws-cdk-lib";
import { aws_ec2 as ec2 } from "aws-cdk-lib";
import { aws_ecs_patterns as ecs_patterns } from "aws-cdk-lib";

export interface PokeAPIConstructProps {
  httpApiGateway: gateway.HttpApi;
}

export class PokeAPIConstruct extends Construct {
  constructor(scope: Construct, id: string, props: PokeAPIConstructProps) {
    super(scope, id);

    const myApi = props.httpApiGateway;

    const fargateService = new ecs_patterns.ApplicationLoadBalancedFargateService(
      this,
      "fargateService",
      {
        taskImageOptions: {
          image: ecs.ContainerImage.fromAsset('app'),
          containerPort: 4567,
        },
        desiredCount: 2,
        memoryLimitMiB: 1024,
        minHealthyPercent: 100,
      }
    );

    const vpcLinkSecurityGroup = new ec2.SecurityGroup(this, "vpcLinkSecurityGroup", {
      vpc: fargateService.cluster.vpc,
      allowAllOutbound: true,
    });

    vpcLinkSecurityGroup.connections.allowFrom(ec2.Peer.anyIpv4(), ec2.Port.tcp(80));
    vpcLinkSecurityGroup.connections.allowFrom(ec2.Peer.anyIpv4(), ec2.Port.tcp(443));

    const vpcLink = new gateway.VpcLink(this, "myVpcLink", {
      vpc: fargateService.cluster.vpc,
      subnets: {
        subnetType: ec2.SubnetType.PRIVATE_WITH_EGRESS
      },
      securityGroups: [vpcLinkSecurityGroup]
    });

    myApi.addRoutes({
      path: "/poke_info/{dex_number}",
      methods: [gateway.HttpMethod.GET],
      integration: new api_integrations.HttpAlbIntegration(
        "spIntegration",
        fargateService.listener,
        {
          vpcLink: vpcLink
        }
      )
    });

    myApi.addRoutes({
      path: "/poke_info",
      methods: [gateway.HttpMethod.GET],
      integration: new api_integrations.HttpAlbIntegration(
        "lpIntegration",
        fargateService.listener,
        {
          vpcLink: vpcLink
        }
      )
    });
  }
}
This construct is a bit more complex, so let’s discuss the key aspects:
- We create the bulk of resources using the
ApplicationLoadBalancedFargateServiceconstruct. If you want to learn more about how it works, check out this lab and this lab where we implement the same thing from scratch - We add routes to our API Gateway and use
HttpAlbIntegrationto integrate it with the ECS cluster. Note that we pass the listener, not the Fargate service itself - The most critical aspect is the
VpcLinkwe create. This resource allows the API Gateway to connect to the ECS cluster. Normally,HttpAlbIntegrationwill create a VPC link automatically, but it creates one without a security group that allows access to the cluster. The solution is to create our own VPC link, associate it with a security group that has the right access configuration, and pass it to theHttpAlbIntegrationconstructor
With this step, we’re ready to deploy our stack!
Testing the Solution
After running cdk deploy and waiting for deployment to finish, you’ll get the API Gateway URL in the output. Mine looked like this:
ApiGatewayPatternStack.APIEndpoint = https://8z5zmq5egj.execute-api.eu-west-1.amazonaws.com
Test the API with these commands:
curl -X GET 'https://<API_ENDPOINT>/gym_info'
curl -X GET 'https://<API_ENDPOINT>/gym_info/4'
curl -X GET 'https://<API_ENDPOINT>/poke_info'
curl -X GET 'https://<API_ENDPOINT>/poke_info/93'
Remember to replace <API_ENDPOINT> with your actual endpoint.
IMPORTANT! Always remember to delete your stack by running cdk destroy or deleting it manually in the console.
Improvements and Experiments
- Write your own additions to the API. For example, implement a construct that creates an ECS cluster running on EC2 and serves data about one of your hobbies
- Note that we didn’t add the app’s root route to the API Gateway. Is it possible to add wildcard routes (
poke_info*)? Would this be a good or bad idea, and why? - Use this experiment as a template to build your own API using a variety of different backends for compute
- Would it be possible to have a similar setup without the load balancer? How would you target the cluster directly? Would that be a good idea?
- Note that we’re passing the API Gateway to the custom constructs and delegating the task of adding routes to each construct. In which scenarios is this approach beneficial, and when might it be problematic?
Establishing boundaries between different parts of your solution is good practice and helps keep your architecture clean and maintainable. This form of information hiding is useful both at small-scale (like defining the public interface of a class) and at large scale (like defining the public interface of a fleet of microservices).
It’s interesting how some ideas are applicable at so many levels, and I hope this lab illustrates that point. As always, feel free to make your own modifications and experiments—it’s the best way to learn!
I hope you find this useful!